Is your LG fridge dispensing lukewarm water instead of refreshing ice cubes? We have all been there. Our comprehensive LG Ice Maker Replacement Guide is here to transform your woes into frosty solutions.
this guide will be your shining star through the often-murky waters of LG ice maker woes. We’ll not only equip you with the knowledge to diagnose the culprit behind your ice maker malfunction, but also empower you to conquer replacement with confidence, step-by-step.
Sound too good to be true? It is not! Dive in and explore the path to restored frosty glory in your fridge!
Identifying the Culprits
Before we dive into the tools and the step-by-step guide, let’s pinpoint the usual suspects behind a malfunctioning LG ice maker:
- Temperature Troubles: Your fridge ice maker won’t work properly if your freezer isn’t cold enough (below -4°F). LG recommends a setting of -2°F or -20°C for optimal ice production.
- Water Supply Woes: A kinked water line or a faulty water inlet valve can disrupt the water flow to your ice maker.
- Electronic Glitches: Sometimes, the control board or the ice maker’s internal components might need a reset or repair. LG provides a handy ice maker test to diagnose such issues.
Did you know that the most common reason for ice maker issues is simply that it’s accidentally turned off? Always check the power switch first – it might save you time and effort!
Troubleshooting steps to diagnose the issue and potentially fix the existing ice maker on LG refrigerator
Before replacing the ice maker I think you have to get it repaired, it’s your luck when your LG ice maker works properly after repair.
I will explain some essential tips and tricks that will help you troubleshoot your LG refrigerator’s existing ice maker:
- Ice Maker Switch: Make sure it’s flipped to “ON” – you did be surprised how often this gets accidentally switched off! It’s usually behind the ice bin.
- Check the Arm: See that metal arm that moves up and down? It should be down for ice making. If it’s up, it means the bin is full, so just push it down to get things going again.
- Water Pressure: Not enough pressure, no ice! You need at least 20 psi for the valve to work. If you’re unsure, check with multimeter (fancy but not too scary!). A water inlet valve should read a resistance value between 500Ω-1.5kΩ. Anything outside of this range suggests failure
- Freezer Temperature: Your freezer needs to be chilly for ice, ideally between 0 and 5 degrees Fahrenheit. If it is warmer than 10 degrees Fahrenheit, that ice maker will not be happy.
- Ice Level Control Board: This fancy bit uses a light beam to see how much ice is in the bin. If it’s faulty, the ice maker might be confused.
Based on the information published on LG Warranty Terms, LG offers a 10 years warranty for the refrigerator compressor and 6 months warranty for ice maker, relay, main PCB, display PCB, heater, fan motor, defrost control assembly, sensor, capacitor, control box assembly, and 3-way valve.
As an LG repairing specialist I am suggesting, If your refrigerator or ice maker is still under warranty, it is recommended to seek professional help for any repairs. If the warranty has expired, you can consider troubleshooting and repairing issues yourself.
Preparing for Your LG Ice Maker Replacement
Embarking on a DIY repair journey can be both thrilling and daunting. But with the right tools in hand and a clear understanding of the task ahead, you’ll feel like a pro in no time.
Let’s gear up!
Gathering Your Toolkit
A successful replacement starts with having the right tools.
Here’s what you’ll need:
- Phillips Screwdriver: The unsung hero of appliance repairs, perfect for most screws you’ll encounter.
- Flat-Blade Screwdriver: Ideal for prying parts gently or depressing locking tabs.
- Spudger (optional): A handy tool for disconnecting connectors without causing damage.
Remember, using the right tool not only makes the job easier but also prevents damage to your appliance and your tools.
A spudger is not just a tool, it’s your best friend for delicate operations. It’s widely used in electronics repair for its ability to safely pry open devices and disconnect small, fragile connectors.
Safety First: Unplugging and Water Supply
Safety should be your top priority. Always unplug your refrigerator before starting any repair. If your replacement involves disconnecting or working around the water supply line, ensure it’s properly shut off to avoid any unexpected leaks or water damage.
LG ice maker replacement: Step-by-Step Instructions

Are you embarking on your LG ice maker replacement? Fantastic! Here’s your detailed roadmap, ensuring each step is clear and manageable.
Remember, you’re not just fixing an appliance; you’re mastering a new skill!
Before we start, let’s ensure everything is safe and organized:
- Safety Precautions: Safety isn’t just first, it’s everything. Unplug your refrigerator and, if necessary, disconnect the water supply. A minor inconvenience now can prevent a major headache later.
- Tool Setup: Gather your Phillips screwdriver, flat-blade screwdriver, and optional spudger. Place them on your workspace, within easy reach.
Now, let’s get to the heart of your refrigerator:
step 1: Open the Freezer Door
Make sure it’s fully open, providing you ample space to work.

Step 2: Remove the Drawer and Bin
Gently lift the upper pull-out drawer and the main drawer bin out of the freezer. It’s like uncovering a treasure chest, but instead of gold, it’s the potential for endless ice!

Step 3: Remove the Drawer Rail Covers
Here’s where your flat-blade screwdriver comes in handy. Use it to depress the two locking tabs on the right and left drawer rail covers, then lift and remove these covers.

Step 4: Remove the Drawer
Use your Phillips screwdriver to unscrew the drawer from the slides. Carefully lift the front of the drawer and pull it towards you to release it from the slides.


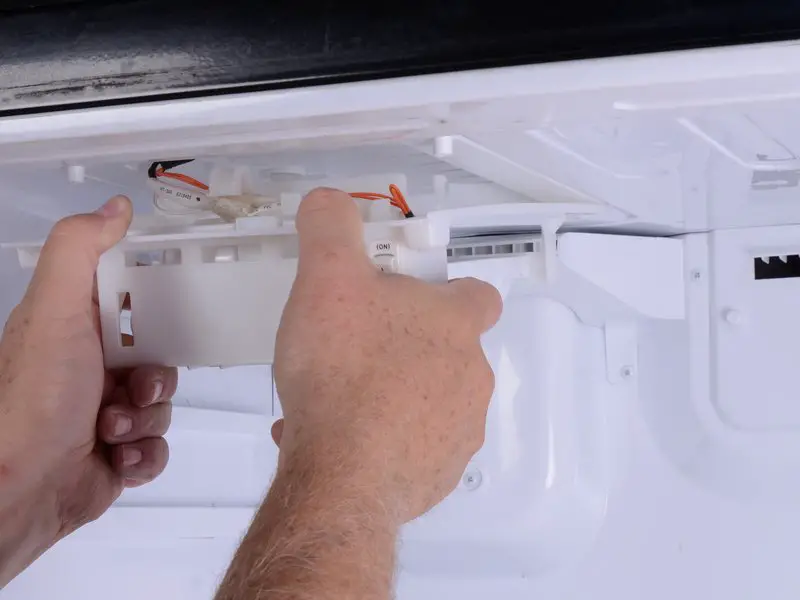
Step 5: Release the Ice Maker
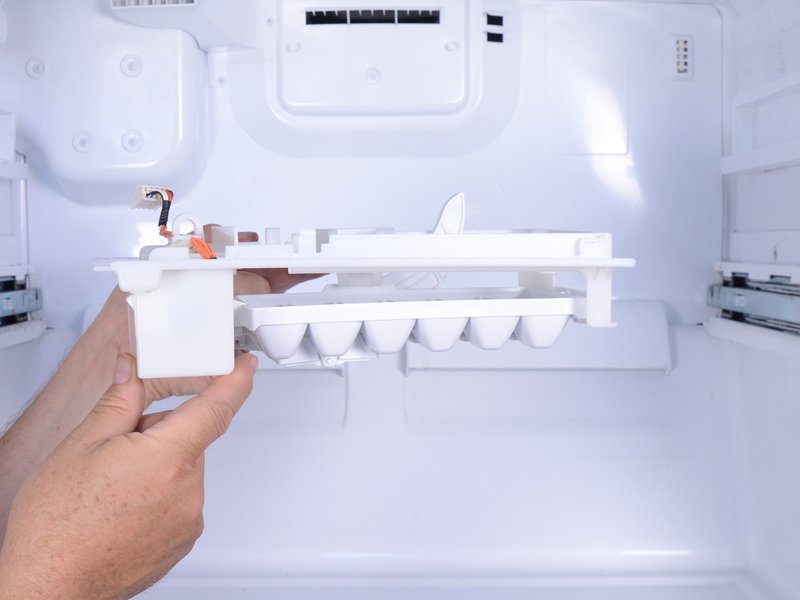
Unfasten the screws holding the ice maker in place. Then, with your flat-blade screwdriver, gently release the locking tabs on the sides of the ice maker. Grasp the front edge of the ice maker and pull it towards you, lowering and removing it.

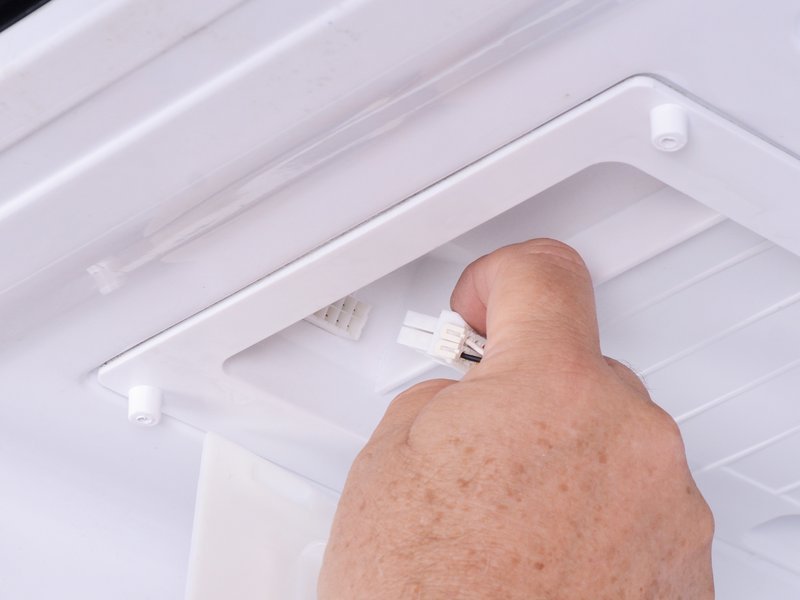
Step 6: Disconnect and Remove the Ice Maker
This is a crucial step. Squeeze the ice maker connector to release it and pull it straight out to disconnect. Now, you can remove the old ice maker.
step 7: Position and Secure the New Ice Maker
Place the new ice maker in the correct position. Ensure it’s aligned properly before screwing it into place.

Step 8: Reconnect Electrical Connectors and Water Supply
This step requires a gentle touch. Reconnect any electrical connectors and, if applicable, the water supply line. Ensure each connection is secure and correctly aligned to prevent leaks or electrical issues.
Step 9: Reassemble Removed Parts
Carefully follow the disassembly steps in reverse order. Ensure every screw is tightened, and every part is securely in place.
Step 10: Test the New Ice Maker
Plug in your refrigerator and turn on the water supply (if you have turned it off). Observe the first cycle of ice production. Check for leaks, listen for unusual noises, and ensure the ice maker is functioning as expected.
Fast Fact: Did you know that regularly replacing your refrigerator’s water filter can significantly improve your ice maker’s performance and ice quality?
safety precautions
Embarking on a DIY project like replacing your LG ice maker can be rewarding, but it’s crucial to respect the inherent risks and prioritize safety. Let’s ensure your DIY endeavour is not just successful but also safe.
Understanding the Risks
- Working with electrical appliances, especially when water is involved, can pose serious hazards. A clear understanding and respect for these risks are your first line of defence.
- Remember, water and electricity are a dangerous mix. Ensuring they don’t cross paths during your repair is vital.
Electrical Safety Precautions
- Unplug the refrigerator: This might seem obvious, but it’s the most crucial step. Even when turned off, appliances can carry a residual charge.
- Check your environment: Ensure the area around your workspace is free from water or any other liquid. A dry, stable surface is non-negotiable.
Dealing with Water Supply
- If your ice maker is connected to a water supply, know how to shut it off. A quick shut-off can prevent minor leaks from becoming major floods.
- After disconnecting, check the area for any residual water. Even a small puddle can be a slip hazard or cause electric shock.
According to the Consumer Product Safety Commission, small appliances were involved in over 40,000 emergency room visits annually. This statistic highlights the importance of safety in handling any appliance repair, including your LG ice maker.
Mindful Tool Use
- Use tools appropriate for the task. Substituting tools can lead to damage to your appliance and increase the risk of personal injury.
- Keep your workspace organized. A cluttered area can lead to accidents, especially with sharp or pointed tools.
DIY or Professional? Making the Right Choice for Your LG Ice Maker
Choosing between a DIY fix and professional repair for your LG ice maker can feel like standing at a crossroads.
Each path has its advantages and potential pitfalls. Let’s delve into the factors that will help you make an informed decision.
Assessing Your Comfort and Skill Level
- DIY Route: If you’re someone who enjoys tinkering with gadgets and feels confident handling basic tools, diving into a DIY project can be fulfilling and cost-effective.
- Professional Repair: If the thought of disassembling your appliance gives you pause, or you’re unsure about troubleshooting complex issues, seeking professional help might be the wisest choice.
Evaluating the Complexity of the Issue
- Some ice maker issues, like minor blockages or simple part replacements, can be straightforward DIY fixes.
- However, if the problem involves intricate components like the control board or refrigeration system, the expertise of a professional technician can be invaluable.
A survey by ImproveNet found that 63% of people who attempted DIY home repairs regretted not hiring a professional, with the primary reason being the task was more difficult than anticipated.
Considering the Cost Implications
- While DIY can save on labour costs, remember to factor in the price of any tools or parts you’ll need to purchase.
- Professional services come with a price tag, but they also offer the peace of mind of guaranteed workmanship and often include warranties on the repair.
The Time Factor
- DIY projects can be time-consuming, especially if it’s your first time tackling such a task. Assess whether you have the time and patience to see the project through to completion.
- Hiring a professional means your ice maker could be up and running much sooner, with minimal disruption to your daily routine.
conclusion
LG Ice Maker Replacement can be a crossroads of DIY enthusiasm or a call for expert hands.
Through my research, I’ve discovered that the key lies in balancing your comfort with tools and the complexity of the task.
Remember, whether you dive into the fix or opt for professional finesse, the goal is a smoothly running ice maker at the heart of your kitchen.
It’s not just about the repair; it’s about the satisfaction of a job well done or the relief of trusted expertise.
FAQs
Can I replace an ice maker myself?
Yes, you can replace an LG ice maker yourself if you have the necessary tools and are comfortable with DIY appliance repairs. It involves unplugging the fridge, removing components to access the ice maker, and handling electrical connectors and water lines carefully.
What are common problems with LG ice makers?
Common problems with LG ice makers include not producing ice, leaks, strange noises, and failure in the ice ejection mechanism. Issues can also arise from a faulty water inlet valve, a kinked water line, or a malfunctioning control board.
How do I reset my LG ice maker?
To reset an LG ice maker, locate the reset button (typically underneath the ice tray), press and hold it for a few seconds until you hear a beep, indicating the reset is complete. Some models may require removing the ice bucket to access the reset button.
When should I replace my ice maker?
You should consider replacing your ice maker if it consistently fails to produce ice, exhibits frequent leaks, or makes unusual noises, or if the repair costs for recurring issues start to add up, indicating a more severe underlying problem.
How much is a replacement ice maker?
The cost of a replacement LG ice maker can vary widely, typically ranging from $50 to $200, depending on the model and features. It’s advisable to consult the official LG website or authorized dealers for the most accurate pricing.