Welcome to our guide on “How to Turn on Bottom Ice Maker on LG Fridge”! Ever felt like your fridge’s ice maker is a tricky puzzle? You’re in the right place.
We’ve uncovered the quirks, hidden buttons, and the balance of temperature and mechanics your LG fridge needs.
Ready to keep your drinks icy cold?
Why Care About the Ice Maker?
LG fridges are efficient and innovative, but sometimes the ice maker can act up. This guide gives you the tips you need to keep it running smoothly.
From adjusting water pressure to clearing vents, resetting power to inspecting motors, we’ve got it all covered.
Plus, our tips make the process easy!
Get Started!
Check out our step-by-step instructions to turn on and troubleshoot your LG fridge’s bottom ice maker. Regular maintenance is key, and our guide ensures you’re ready to handle any issue.
Ready to explore more? Click through for detailed insights and keep those ice cubes coming!
why is my ice maker not working?

Water Pressure and Valve Adjustments
If you have a ball-type water valve behind your fridge, adjusting it can solve many problems.
Try turning it to 45 degrees or less to regulate the water pressure. Remember, too much pressure can lead to leaks or malfunctions.
Fun Fact: Your refrigerator’s water pressure should ideally be between 20 and 120 psi for the ice maker to function properly.
Checking the Inlet Valve: Don’t overlook the water inlet valve! Many LG fridges have two – a main valve and a secondary one for the ice maker. Using a multimeter, you can check both for functionality.
Air Circulation in the Freezer
Avoid Blocking Vents: Proper air flow is key. Make sure food items aren’t crammed together, blocking the vents. This can impact the freezer’s temperature, which in turn, affects ice production.
Resetting and Power Issues
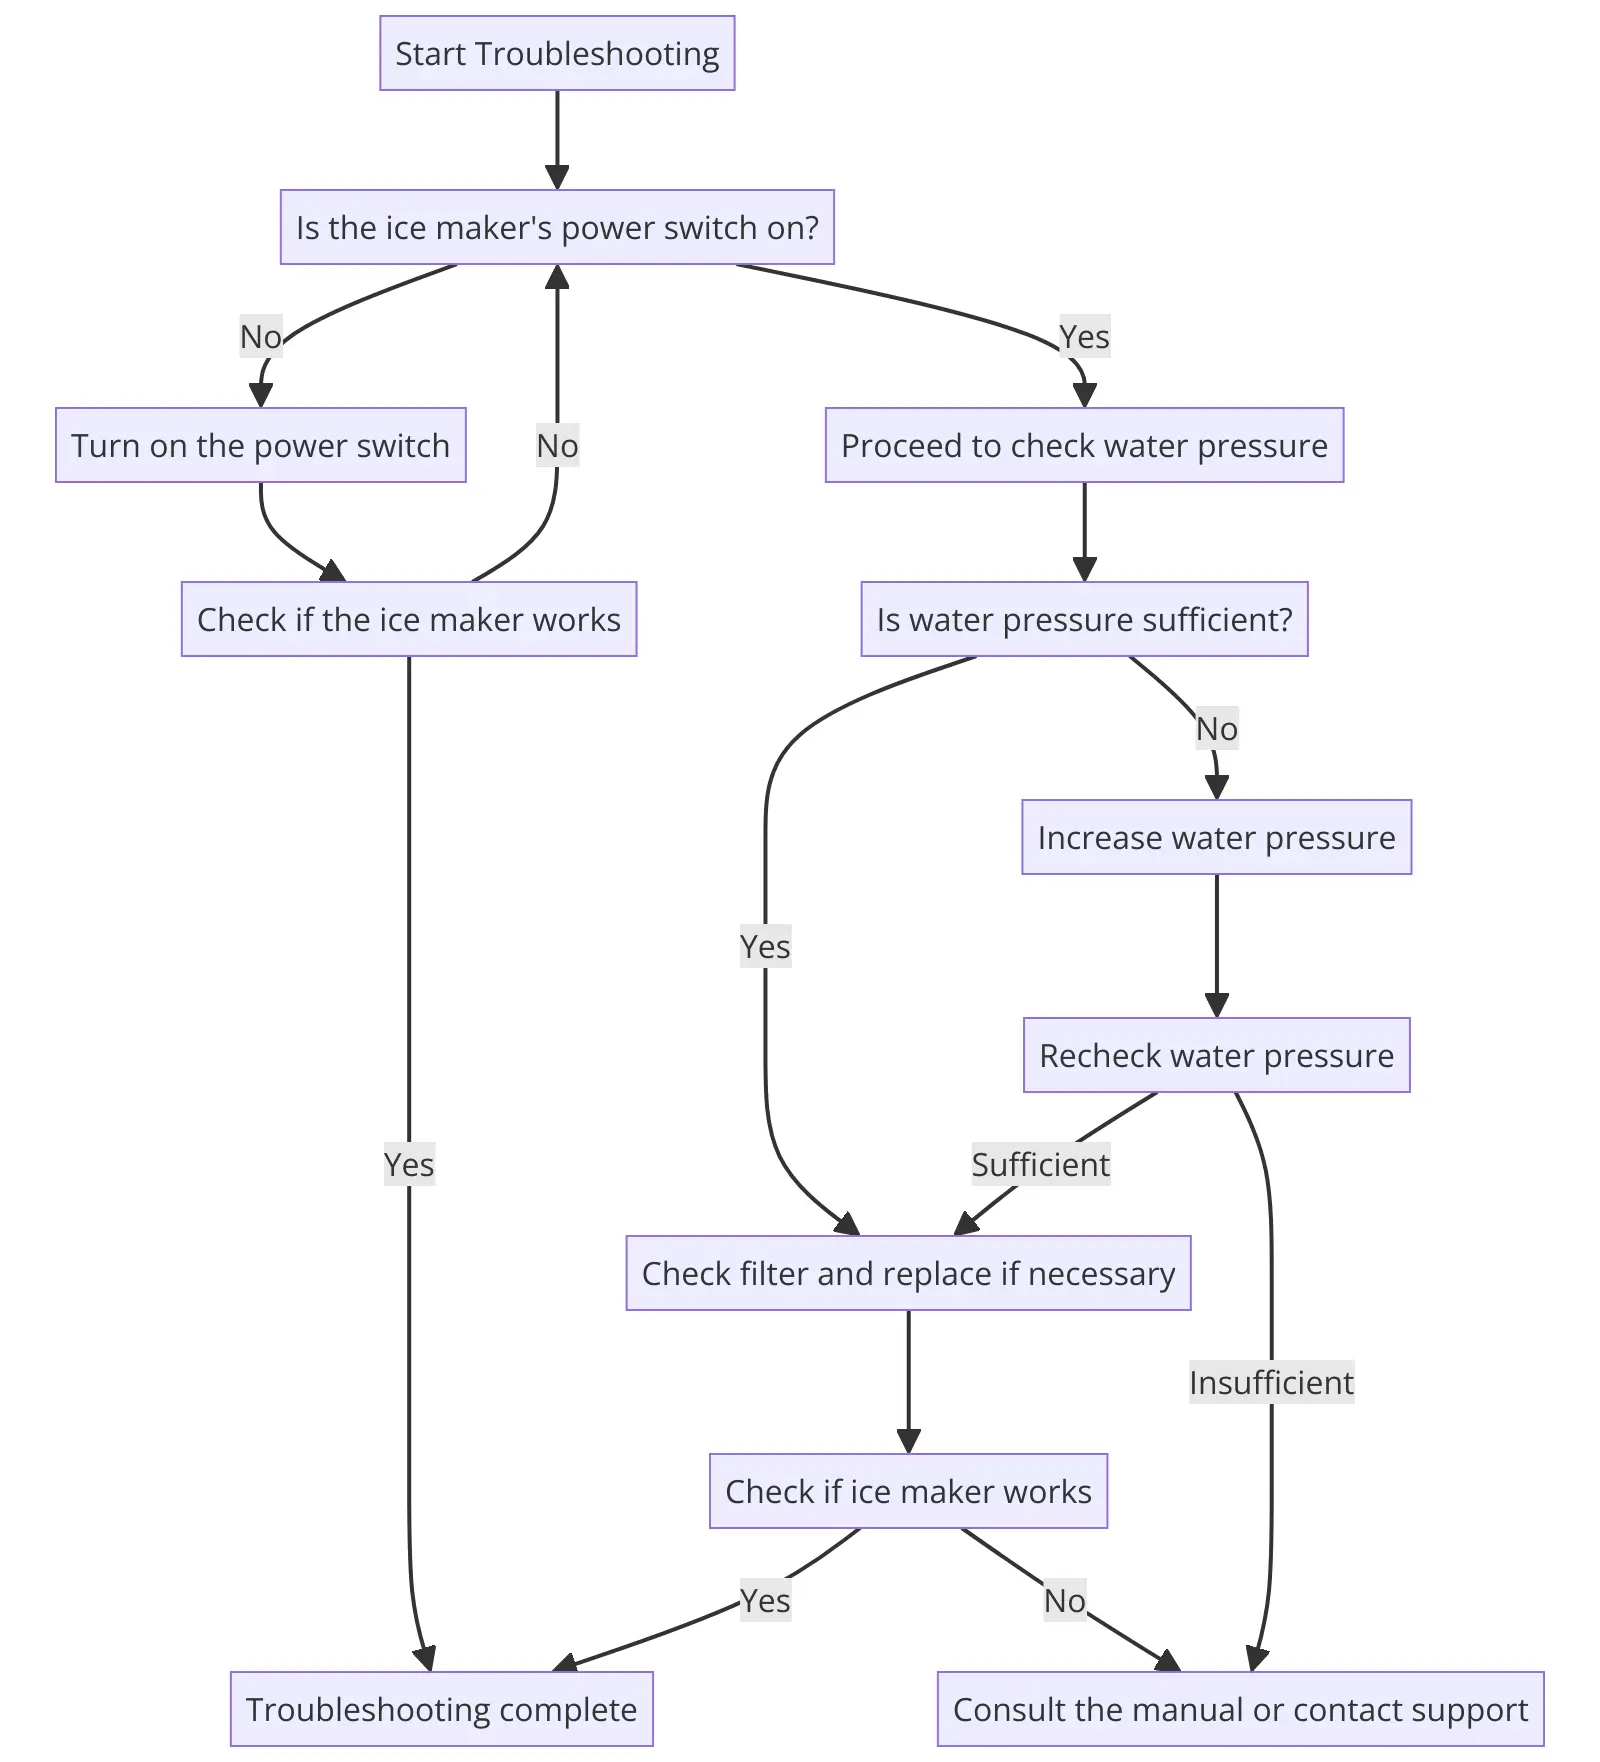
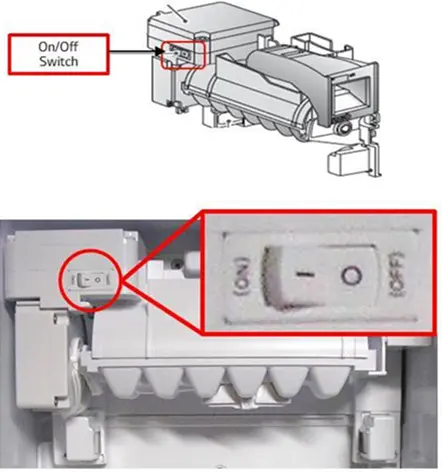
Power Switch and Reset: Is your ice maker’s power switch on? Sometimes, it’s the simplest thing! If it’s on but still not working, try resetting by turning off the switch or unplugging the fridge for 5 minutes.
Water Supply Concerns
Continuous Water Supply: Check your water dispenser and ice dispenser. If they’re not functioning correctly, it could point to a water line issue. Ensure the valve is open and there are no kinks or blockages in the line.
Motor and Control Board
Motor and Board Inspection: Listen for any unusual noises and look for signs of wear. If you suspect an issue with the control board, it may require a professional diagnosis.
Ice Tray and Sensor Checks
Inspecting the Ice Tray: Look for damage or obstructions. A faulty flow sensor can disrupt water flow to the ice maker, so it’s crucial to ensure it’s working correctly.
How to Turn on Bottom Ice Maker on LG Fridge: Step-by-Step Guide
French Door and Side-by-Side Refrigerators
- Locate the control panel: It’s usually on the door dispenser or inside the refrigerator compartment.
- Look for the “Ice On/Off” or “Ice Plus” button: It might have a star icon next to it.
- Hold the button for 3-5 seconds: You should see the “Ice On” indicator illuminate.
Adjust Water Valve to Control Flow
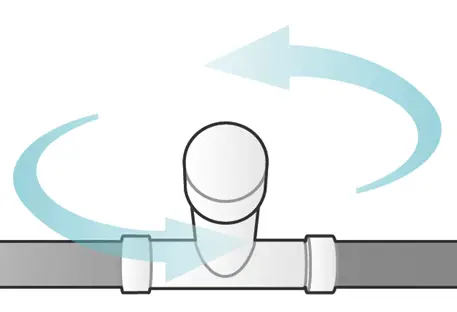
If ice maker issues are giving you the cold shoulder, start with the water valve. Here’s how to get the pressure just right:
- Locate the water valve behind your fridge. It’s usually a ball-type valve.
- Gently turn the valve to about 45 degrees. This isn’t a one-size-fits-all, so you may need to adjust slightly to find the sweet spot.
- Test the water flow at your dispenser. If you’ve got a buddy, have them adjust the valve while you monitor the flow. Getting it just right can be like tuning a vintage radio – it requires a delicate touch.
Check Inlet Valves for Damage
The inlet valve is like the gatekeeper for water entering your ice maker. Here’s how to check it:
- Find both valves – remember, there’s the main and the secondary (often the troublemaker).
- Use a multimeter to test each valve. No reading? You might have found the culprit.
- Inspect for any physical damage. Sometimes it’s not about the flow, but about the hardware itself.
Clear Vents so Freezer Can Breathe
Your freezer needs to breathe! Make sure it’s not gasping for air with these steps:
- Check the vents – they should be clear of any food packages or frost build-up.
- Rearrange your freezer contents if needed. Air should flow freely, like a gentle arctic breeze.
- Keep the door seals clean and intact. A tight seal keeps the cold in and the warmth of your kitchen out.
Reset Ice Maker to Reboot System
Sometimes, your ice maker just needs a little reboot. Here’s how to reset it:
- Locate the test/fill button. It’s like the secret handshake for ice makers.
- Press and hold it until the cycle starts. This might take a few seconds, so don’t rush it.
- Listen and look for signs of life. You should hear the sound of moving parts and see some action in the ice tray.
Inspect Motor and Listen for Noises
The motor is the muscle of your ice maker. Make sure it’s in good shape:
- Listen for strange noises. Grumbling, clicking, or silence can all be signs of trouble.
- Feel for excessive heat. Like any hard worker, the motor can get overheated, but it shouldn’t be too hot to touch.
- Check for any visual damage. Sometimes, you can spot a problem just by looking.
Check Control Board Error Messages
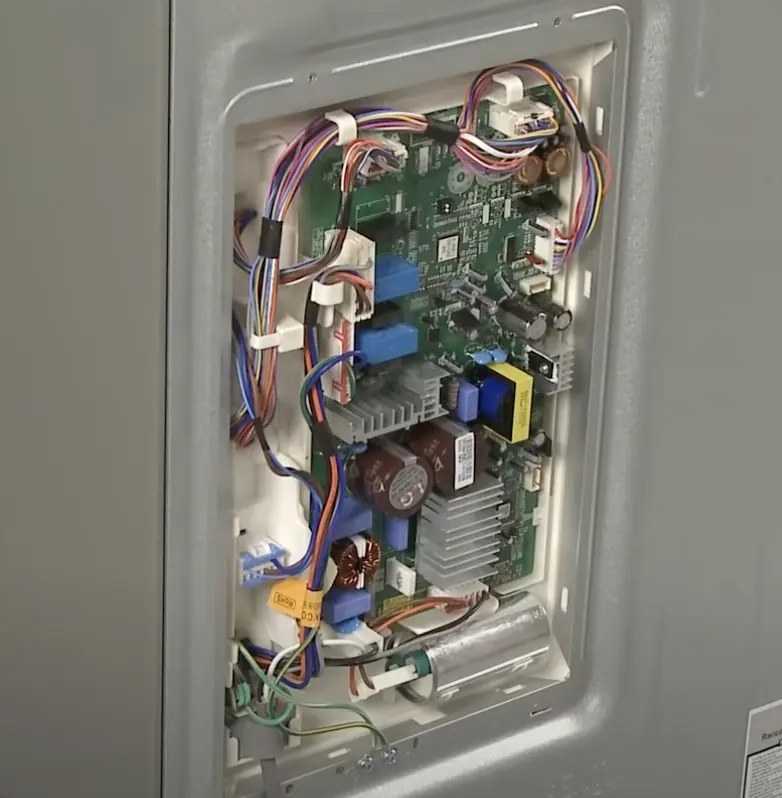
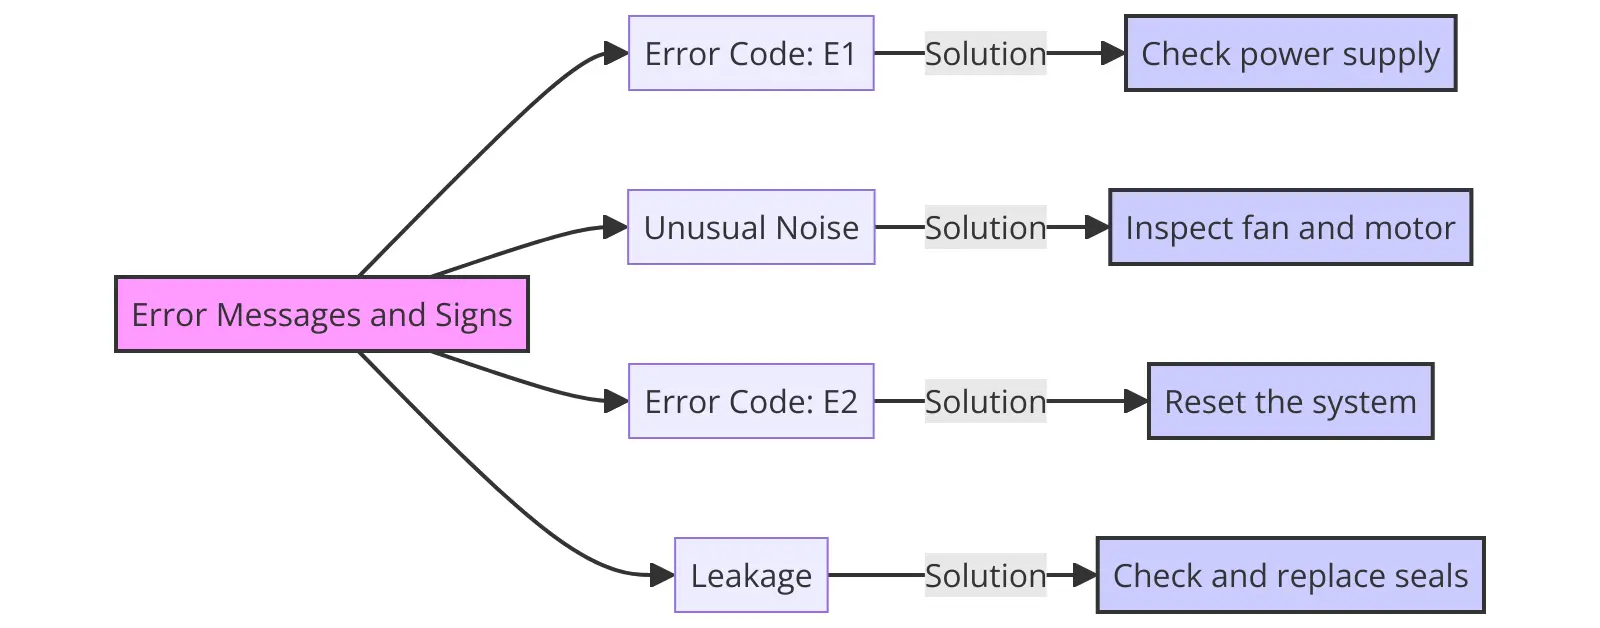
The control board is the brain behind the operation. Here’s how to check if it’s doing its job:
- Look for any error messages or lights. These can be cryptic, but they’re trying to tell you something.
- Test the power supply to the ice maker. If it’s not getting power, the control board might be on strike.
- Consider a professional diagnosis. Control boards can be complex, and sometimes you need an expert to crack the code.
Look for Ice Tray Cracks or Blockages
The ice tray and flow sensor are where the water turns to ice. Make sure they’re working harmoniously:
- Inspect the ice tray for damage. Cracks or warping can lead to leaks and other ice tragedies.
- Ensure the flow sensor is unobstructed. It’s the watchful eye over your ice production, so it needs a clear view.
- Regularly clean these components. A little maintenance can prevent a lot of headaches.
Maintaining the Water Filter and Inlet Valve
A clean filter and a functional inlet valve are key to tasty, plentiful ice:
- Replace the water filter every six months. Old filters can lead to poor water quality and reduced ice production.
- Regularly inspect the inlet valve for leaks or damage. A small drip can lead to big problems.
- Keep an eye on the fill hose and connections. They should be secure and free from damage to ensure a steady water supply.
Regular Maintenance: Ensuring the Longevity of Your LG Fridge’s Ice Maker
They say an ounce of prevention is worth a pound of cure, and this couldn’t be more true for your LG fridge’s ice maker. Regular maintenance is not just a chore; it’s a ritual that keeps the heart of your fridge beating strong.
Maintain Freezer Temperature Between 0-5°F

First off, let’s talk about temperature. Your freezer’s climate is the cradle of ice production. Maintaining it between 0 and 5 degrees Fahrenheit is crucial.
Remember, a freezer that’s too warm is like a sunny day at the beach for your ice cubes – not ideal for their existence!
Regularly check and adjust the freezer’s temperature settings to ensure optimal conditions for your ice maker.
Replace Water Filter Every 6 Months
Now, onto the unsung hero of taste and clarity – the water filter. This little device does more than just purify your water; it protects your ice maker from sediment and scale buildup.
Replace your water filter every six months or as recommended by your manufacturer. A fresh filter means clean, clear ice and a happy ice maker.
Inspect Water Inlet Valve if Issues
The water inlet valve is like a gatekeeper for your ice maker. If it’s faulty, water can’t flow in to create those ice cubes we all love.
If you notice no water in the ice mold or an unusual noise when the ice maker should be filling, it might be time to inspect this valve.
A multimeter can help you diagnose its health. If it’s not showing continuity or if it’s visibly damaged, a replacement might be in order.
Check Motor if Overheating/Noisy
The motor is the heartbeat of your ice maker.
If it’s overheating or making strange noises, it’s sending you an SOS signal. Before considering a replacement, make sure it’s not obstructed and that it’s receiving power.
If all seems well but the issues persist, it might be time to consult with a professional or consider a replacement.
Test Control Board if Non-Operational
The control board is the brain of your ice maker. If it’s not sending power where it’s needed, the whole operation comes to a standstill.
This is a more complex issue and might require a professional’s touch.
However, if you’re comfortable with electronics and have ruled out other issues, testing the control board with a multimeter and consulting the fridge’s schematic can be a good start.
Regular Checkups Every Few Months
Just like us, your ice maker needs regular check-ups. Take time every few months to:
- Inspect the ice maker assembly for any signs of wear or damage.
- Ensure that the fill hose and water inlet valve are securely connected and leak-free.
- Check the ice bucket for any buildup of ice or debris that could obstruct the sensor.
- Listen for any unusual noises during the operation, which could indicate a mechanical issue.
Final Thoughts
In exploring “How to Turn on Bottom Ice Maker on LG Fridge,” I’ve uncovered a wealth of tips and steps.
But remember, it’s not just about the fix—it’s about understanding your appliance.
Regular maintenance and a keen eye for early signs can prevent most issues.
And when in doubt, professional help can be your best bet to keep those cubes coming!
